
Video
The question of how missiles should be employed is as old as flight sim games themselves. I asked myself the same question when I moved from RW to FW a few years ago. For example, in a 2v1 situation, the Section may be firing a missile on each, or only one fighter should launch. As sometimes happens, simulative games mimic reality, and this article tries to answer the same question: How many missiles should we shoot?
In 279 BC, King Pyrrhus of Epirus routed a Roman army in the Battle of Asculum. His army in shambles after the hard-fought engagement, he supposedly declared, “One more such victory and we are lost.” We face a similar problem today in air-to-air combat. We must optimize the use of our limited supply of missiles, or we may win engagements but lose the war. In Vietnam, the USAF’s first air-to-air missile war, firing multiple missiles at a bandit was the norm. But will that strategy maximize our chances of ” winning” the aerial portion of the next war? Will we again have many missiles and relatively few targets? Can we expect a similar probability of kills (PKs)? Granted, launching multiple missiles at a bandit will increase the PK on that individual engagement, but what does this cost us? In the resource-limited environment of the real world, we must optimize our use of aircraft and missiles. To that end, the Joint Studies Group was asked to explore employment strategies for air-to-air missiles.
Our approach was to develop a method to quantitatively evaluate how different shot strategies affect the outcome of individual engagements and, eventually, the war. To this end, we developed a model that considered the following factors:
- Blue Air Order of Battle
- Airborne Attrition
- Red Air Order of Battle
- Missile Load
- Missile PKs
- AMRAAM Launch and Leave
- Missile Inventory
- Missiles Expended
- Shot Strategies
- Disengagement Percentage
- Blue/Red Advantages
- Aircraft Losses
- Role Reversal
- Exchange Ratio
All assigned values came from expert sources such as the System Command’s Foreign Technology Division and HQ Air Force’s Project Checkmate. The model output consisted of the expected number of Blue losses, Red losses, and missile expended. The model was resource-constrained in that the fight was terminated once:
- all the bandits were killed;
- all Blue fighters were lost or;
- Blue’s missile inventory was exhausted.
According to AFM 1-1, the Air Forces’s air-to-air objective is to “neutralize or destroy enemy aerospace forces.” Historically, we have attempted to achieve this objective while managing our own combat attrition to an acceptable long-term level. In this study, we assumed that while minimizing our losses is important, it should be secondary to maximizing ENEMY losses.
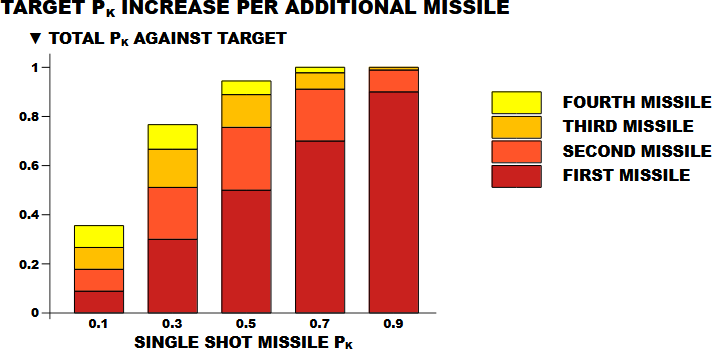
To see how best to accomplish this, we defined, by missile type, two shot strategies for our model: SHOOT and SHOOT-SHOOT. The SHOOT strategy assumes that each Blue fighter launches only one missile at any single bandit, although a second missile may be launched at the same target once the outcome of the first is known. In this case, a Blue fighter may have multiple missiles airborne (and guiding), but each missile must have a different target. The SHOOT-SHOOT strategy considers a scenario where a second missile is committed to the same target before knowing the outcome of the first missile. We elected not to examine a SHOOT-SHOOT-SHOOT or higher case because the marginal utility (expected PK increase per missile) of a third or fourth missile is relatively low when considering current missile PKs. Figure 1 depicts how the marginal utility of follow-up missiles decreases as the PK of the individual missiles increases.
Though the exchange ratio is a common measure of success, we found it was not the best measure for this study. Sure, we can maximize the exchange ratio by always firing all of our missiles at the first bandit we engage and then returning to base. But after we run out of missiles, how many of the enemy have we killed? Consider the results of the following hypothetical example evaluated by our model and depicted in Table 1.
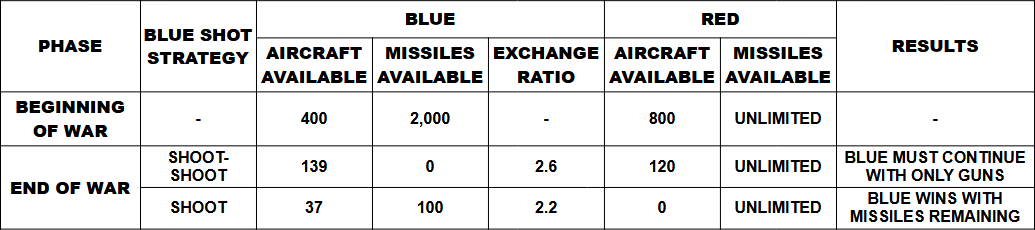
Blue has 400 fighters and 2,000 missiles (0.5 PK each). Red had 800 aircraft with an unlimited number of 0.4 missiles. Red is using the standard Soviet shot philosophy (see your squadron weapons officer for details). A SHOOT-SHOOT Blue strategy will produce a 2.6 exchange ratio, with Blue killing 680 bandits and losing 261 fighters before exhausting his missile inventory. As a result, Blue’s 139 surviving fighters must now face the remaining 120 full-up Red bandits with guns only. What is this going to do to the final exchange ratio?
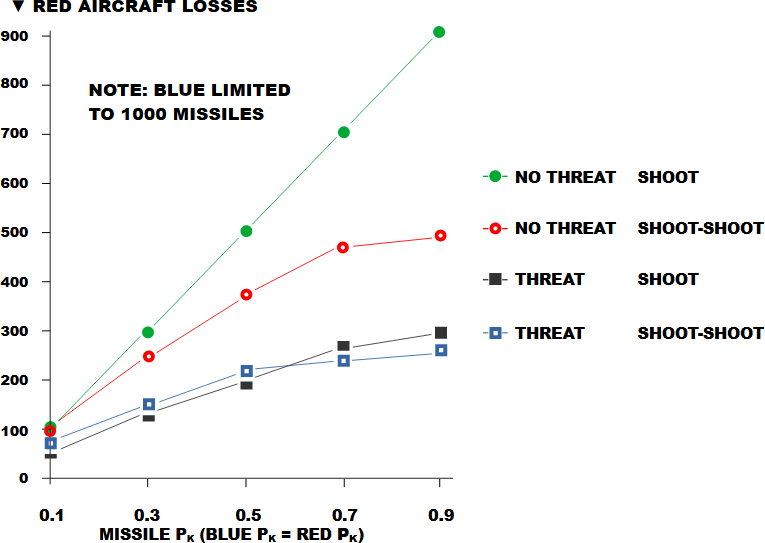
On the other hand, if Blue instead employs a SHOOT strategy, he achieves a 2.2 exchange ratio and kills all 800 Red aircraft while losing 363 Blue fighters. Blue, therefore, wins the air war with aircraft and 100 missiles remaining. Next, let’s analyze how the threat level affects the results achieved by the two-shot strategies. Figure 2 illustrates the effects on Red aircraft losses associated with two different Red threats: Red never shoots back (NO THREAT), and Red employs a SHOOT-SHOOT strategy (THREAT). In this example, both Red and Blue PKs are equal; Blue has 1,000 missiles, and Blue’s strategy is varied from SHOOT to SHOOT-SHOOT. As Figure 2 shows, the “best” shot philosophy for limited missiles changes depending upon the threat and missile PK.
Our study looked at missile employment throughout the entire air war, with the objective of maximizing overall results. Clearly, there’s no one right answer for all cases and missiles. Table 2, however, summarizes our study results and the suggested shot strategy.

It should be understood that these shot strategies were derived from an analytical model and can not be considered hard doctrine. However, they do provide a forum for further discussion. Any such discussion needs to include considerations such as mission, theatre, enemy threat potential, and other pertinent planning factors. Although the final decision ultimately rests with the man in the cockpit, a well-conceived employment strategy will certainly make that decision easier. Hopefully, this information may help you make the right decision.
Bitburg, Day three of the war, Lt. Ridley writes: “Today I got my second kill. I was told on landing that our exchange ratio has been great, but we are out of missiles. Tomorrow I go after my third with guns only… ” Editor’s Note: Though not exactly a household word in the TAF, the Joint Studies Group is an analytical organization made up of fighter pilots, WSOs, analysts, and computer experts. They work for Major General Charles Horner, TAC/XP, and are based at Langley AFB.
I hope you have found this article as interesting as I did.
Articles such as this and the previous one about the transition from pilot-backseaters to navs-WSOs in the US AF are incredible sources of information. Although we play a video game, many questions and topics cross the boundaries between reality and simulation, and these documents provide a great perspective that is worth preserving and sharing with everyone.
