
This technique was developed by the then Captain Charles Sallee, Luke AFB, in 1977.
Flow
Speed advantage is, as always, a requirement. Although based on the 5:4 ratio of previous techniques, the “40 Cold of CATA” is not as stringent and works down to co-speed.
The idea is to follow a curve starting at, you guessed it, 40° cold of CATA at 25 nm and terminating the intercept with a stern conversion. For every mile closer than 25 nm, a degree should be added to the curve, and thus, the following checkpoints can be determined:
| Range | Angle |
| 25 nm 20 nm 15 nm 10 nm |
40° 45° (+5°) 50° (+10°) 55° (+15°) |
The fighter can intersect the intercept curve at any of these points, depending on when the target is spotted on the radar scope.
For example, if the target is illuminated at 24 nm, the closest checkpoint is 20 nm. This latter value is dubbed “will be range”, as it indicates the range at which the curve is intercepted.
As the fighter follows the curve, at some point, they need to turn to roll out on the target’s 6 o’clock. There are several ways to assess how the conversion is performed. A suggested technique is to evaluate HCA and turn as soon as its value equals twice the ATA.
To recap, we need to:
- Determine CATA and HCA;
- Determine both the current and the “will be range”;
- Determine the curve to intercept at the “will be range”;
- Manoeuvre to match the assessed curve;
- Move to Pure pursuit when HCA = 2 x ATA.
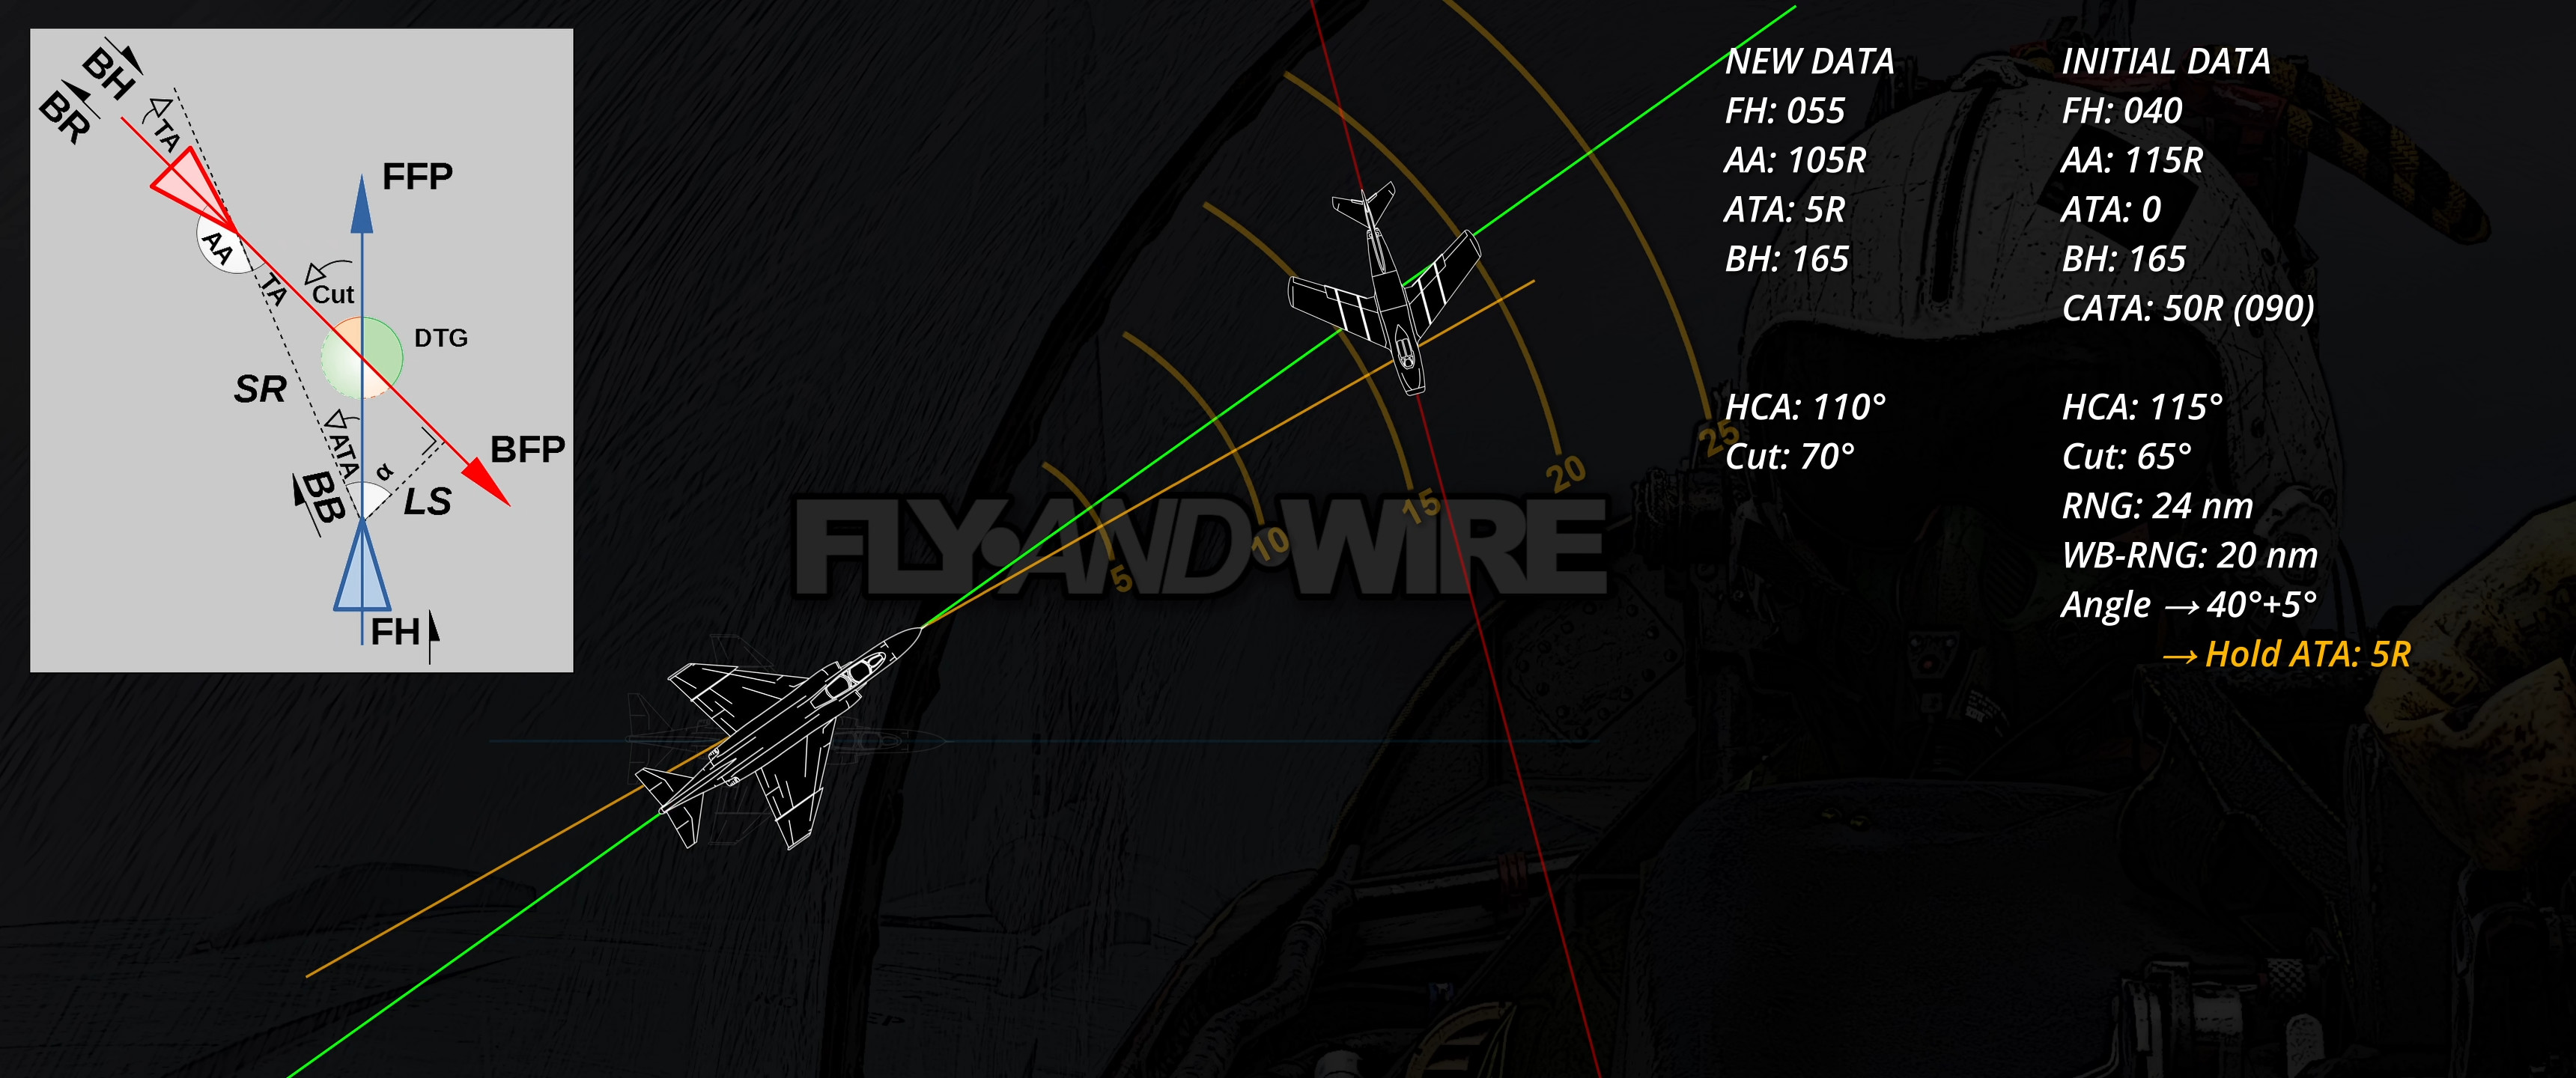
In this example, the first three points are determined during the “point and assess” phase, when the target is placed on the fighter’s nose.
In this case, CATA and BH are assessed as described in the previous article. The range is circa 24 nm, ergo the “will be range” is 20 nm. Thus, the desired amount of degrees cold of CATA is 40 + 5 degrees. Since CATA is 50R, the fighter turns to place the target 45° Colder than that, ergo at ATA 5R. Going forward, the goal is to maintain the target at such an azimuth until 2 x ATA equals the HCA. Unfortunately, the geometry of this randomised scenario does not show this eventuality, as the fighter would likely get a tally before the condition is met.
Observations
A number of points are worth mentioning:
- Precise CATA is fundamental for this technique. DCS controllers are very poor and unhelpful, so the crew is left to find what they need. A helpful trick recently discussed on FlyAndWire is to assess CATA, the bandit’s heading, and the scope sides all together by placing the target on the nose. Once the bandit’s heading is determined, HCA’s value is instantaneous.
- I noticed it is worth skipping a checkpoint to ensure that CATA is correct. If an adjustment is required, remember to apply it to HCA accordingly.
- Lastly, if the target is not manoeuvring, I think the easiest way to monitor the curve and assess when to switch to pure pursuit is to calculate the heading at which the fighter should be to satisfy the ATA and HCA relation. This “FFH”, or Final Fighter Heading, allows the crew to focus on the situation and monitor the turn with a quick glance at the BDHI.
Practical Example
In this scenario, depicted in the video linked above, a fictional British F-4E is intercepting a bogey out of the southern coast of England.
As demonstrated in the previous video, with practice and experience or a bit of ingenuity, the crew can assess the drift rate, which is then used to determine CATA and the Bandit’s heading.
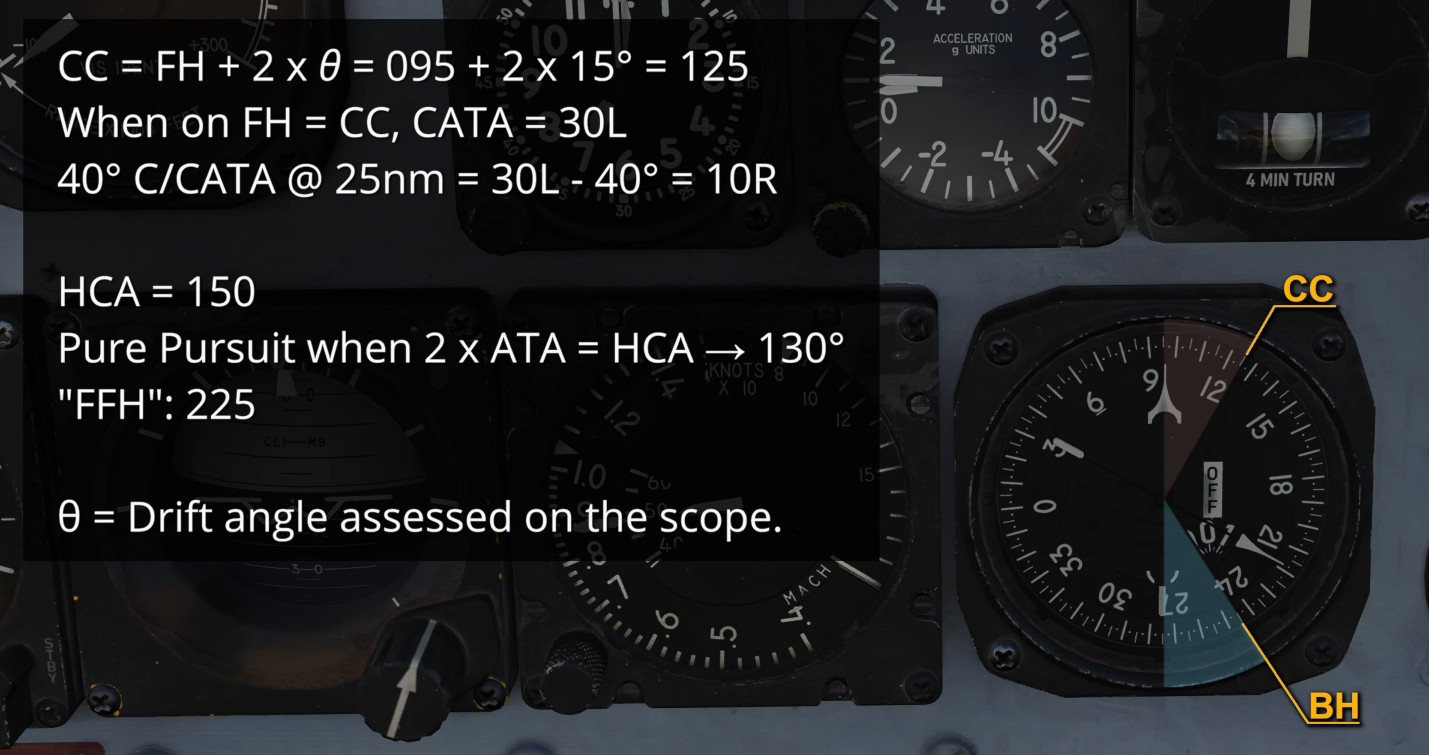
The drift is minimal, but the Angle of Bank must be considered. The drift angle theta seems to be around 10° or 15°.
CATA is, therefore, 30° towards the cold side from the fighter’s heading, whereas the bandit heading is 30° from the fighter’s reciprocal. In relative terms, CATA is 30L.
Since the range is circa 35 nm, the desired “will be range” is 25 nm. At such a distance, we need to place the bandit 40° cold of CATA, ergo 10R.
The value of HCA can be immediately determined from the BDHI as 150. I will turn to Pure pursuit when 2 times 10 equals the HCA. To simplify things, I can use a reference heading calculated as BH minus twice the ATA, therefore 225.
That said, given the amount of correction required for the intercept, 150°, the range will likely be relatively low by the time I hit the aforementioned value. The situation is made more complex by the considerable speed difference I purposely used in this example. Therefore, if necessary, I will anticipate the turn to Pure pursuit.
Remember that rules, techniques, and tools are great and welcomed, but eventually, the crew decides on the course of action most suitable to the situation.
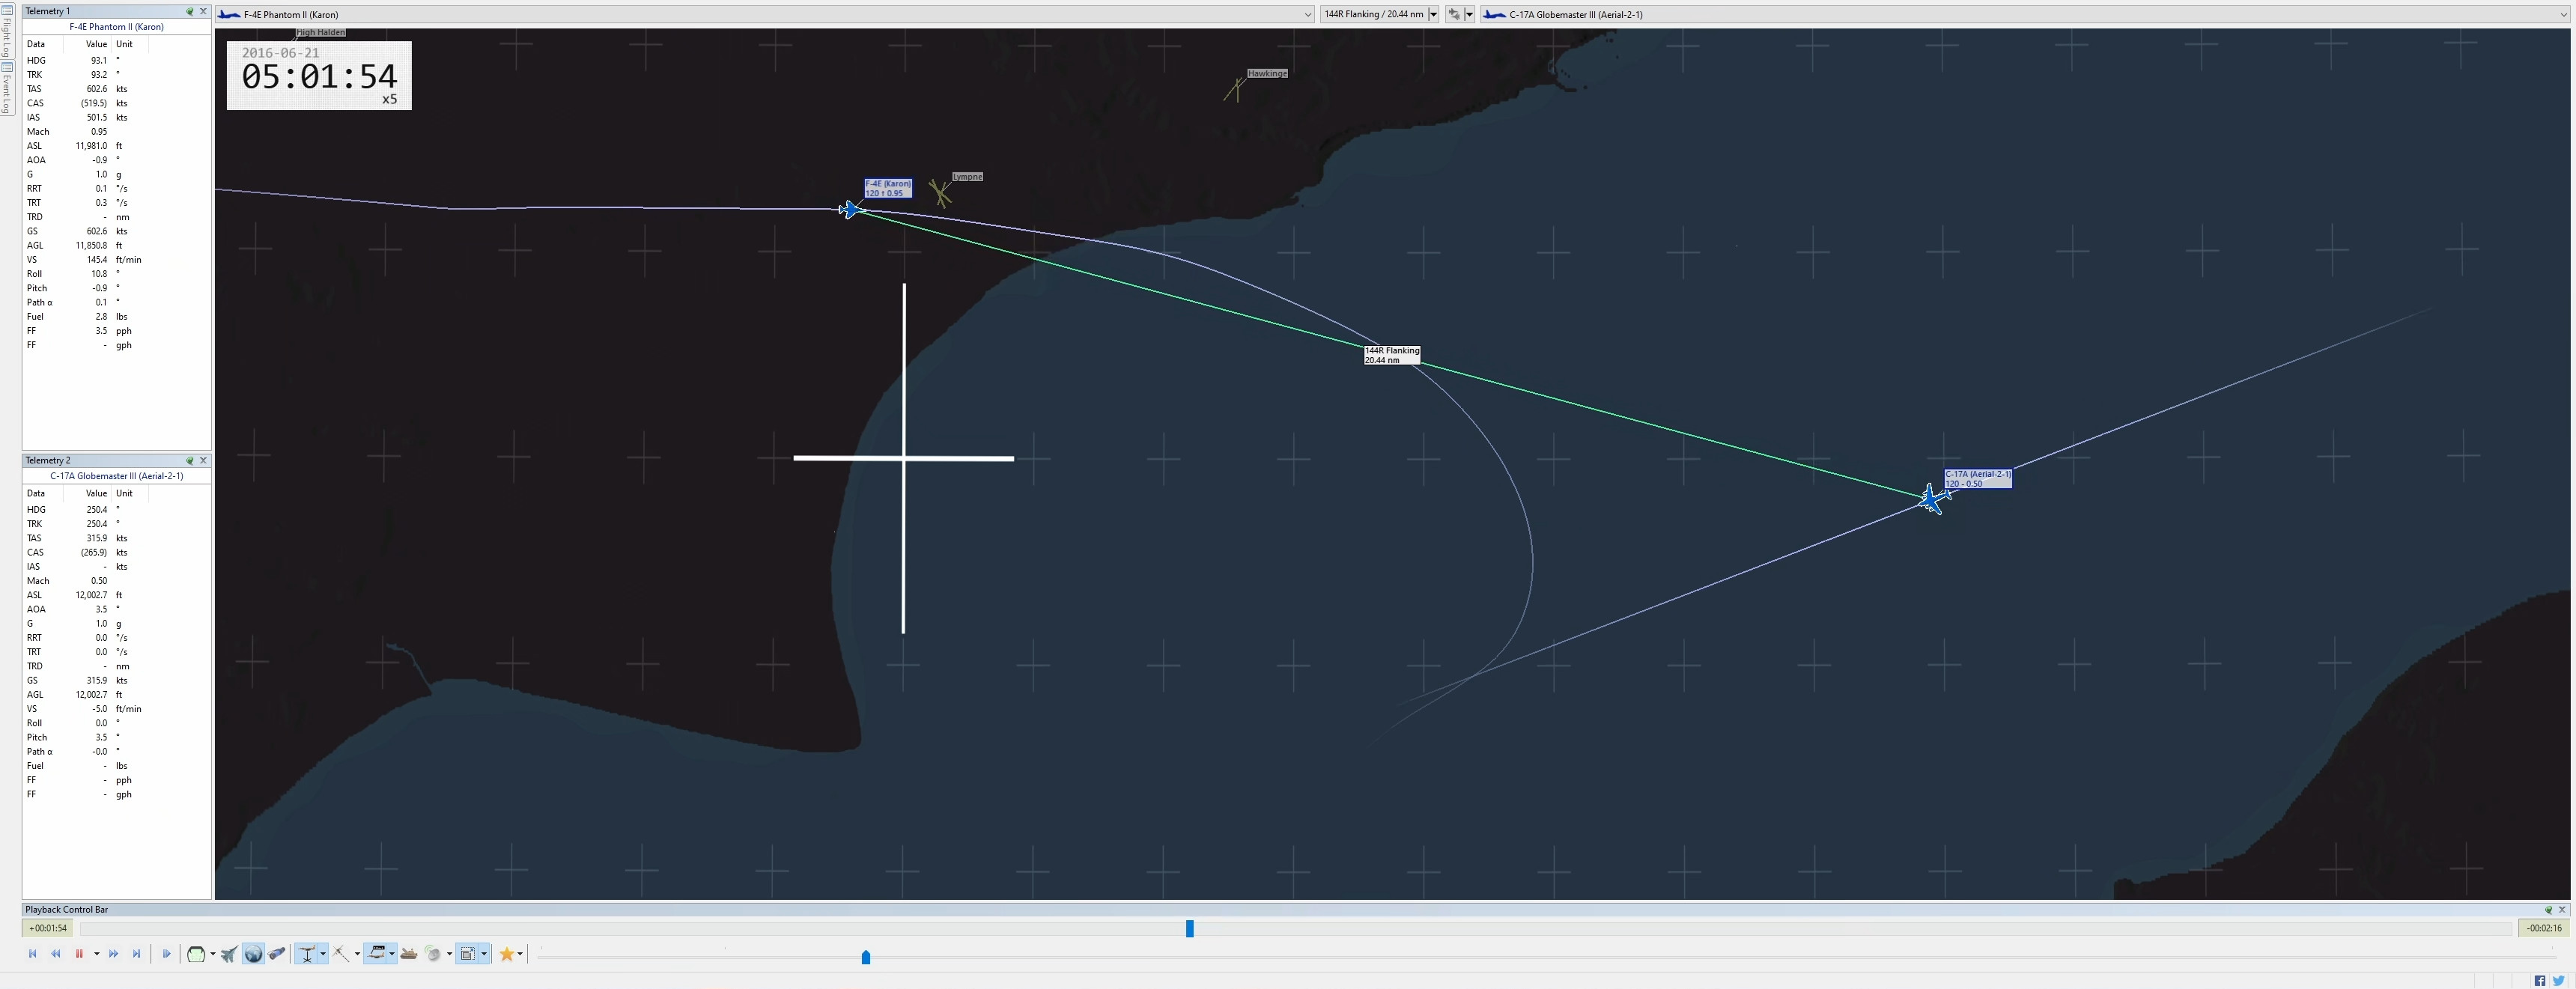
TacView better shows the intercept. Two things worth mentioning. In primis, I purposely set a slow-flying target and cranked the throttle close to Military to create a vast speed difference. This proves how this technique works even outside the usual 5:4 speed ratio. In fact, here, the ratio is almost 2:1: Mach .95 for the Phantom and M.5 for the Globemaster. It goes without saying that a proper intercept requires throttle management depending on the task, such as VID, tanker rejoin, et cetera.
Second, the assessment of the bandit’s heading was close but not completely precise, with a difference of 5°. Overall, it’s not too bad, but this discrepancy indicates once again that, at the end of the day, the crew can adjust their pursuit, and excessive fixation on precision is not feasible nor recommended.
I hope you have found this topic interesting. The “40 Cold of CATA” is not a complex manoeuvre, but I doubt it will be used often since we are playing a videogame, and techniques such as the Sync-Z-Turn are vastly more suitable to most players.
