Your Attention Please!
This article is outdated. Heatblur and ED have developed a new missile API in late 2020 so the way the WCS guides the missiles has changed.
I am waiting for them to finalize the new implementation before writing a new study about the updated guidance model and the AIM-54.
This is the first part of a series of articles about the Probability of Kill of the AIM-54 Phoenix. Two versions of the missile will be considered: the AIM-54A Mk60 and the AIM-54C Mk47.
In order to understand how the current implementation of the Phoenix missile work, I decided to make a number of tests at different distance, altitude and aspect in a controlled testing environment.
Testing: Modus Operandi
The first iteration of the test was limited to ~1000 samples but I found it to be somehow random. The target was a MiG-29A. I collected a few hundred results before concluding that the test wasn’t accurate enough.
The current test uses a number of more rigid criteria. In primis the aspect:
- HOT: the target is flying head-on at 500kts.
- HOT DIVE: the target is flying head-on at 600kts and its initial altitude is 5000ft higher than the F-14B;
- FLANKING: the target is flying left to right at 500kts. Its heading vector and the F-14’s one form an angle of 45°.
- NOTCHING: the target is flying left to right at 500kts. Its heading vector and the F-14’s one form an angle of 90°.
Each of these tests is repeated 10 times, therefore a complete “batch” of tests is composed by 40 AIM-54.
The tests are then repeated at different distances and altitudes:
- 15nm, 1000ft;
- 20nm, 1000ft;
- 20nm, 15000ft;
- 25nm, 1000ft;
- 25nm, 7000ft;
- 25nm, 15000ft;
- 25nm, 25000ft;
- 30nm, 20000ft;
- 30nm, 30000ft;
- 35nm, 20000ft;
- 35nm, 30000ft;
- 40nm, 20000ft;
- 40nm, 30000ft;
Initially the target was always the same, a MiG-29S. Later I opted for repeating the tests using different targets. I choose a Su-27 and the F/A-18C. These aircraft are flyable and have an updated FM, although the AI in DCS is well-known for being somehow eccentric when it comes to follow the rules of physics.
The reason for testing multiple aircraft is that each one uses similar defensive manoeuvres each time; therefore a test can either be too positive or negative depending on the applied defensive technique. By testing different aircraft, I limit the impact of such issue therefore the conclusions should be more accurate.
The AI skill is always set as High.
Both the AIM-54C Mk47 and the AIM-54A Mk60 are tested for each aircraft and test combination. In case the Phoenix misses the target, I took note of the reason: the missile may run out of energy, the AWG-9 may lose the lock before the activation of the missile and the AIM-54’s seeker can be defeated. Nevertheless, I tried to remove the AWG-9 variable from the tests by manually locking every aircraft in PSTT. After all, these tests are about the AIM-54, not the AWG-9.
The total amount of AIM-54 fired is 13*40*2*3=3120 (around 3700-3800 including the previous tests I discarded because I was unsatisfied with the conditions). As you can imagine, this takes time.
All targets have their CAP behaviour disabled except for the Notching target. Otherwise, as soon as the target is locked, it accelerates and flies towards the F-14B, making the evaluation of the energy factor less consistent. The notching target instead is free to manoeuvre as it pleases. If it wasn’t, the vast majority of the AIM-54 would not be able to even get close to the target before running out of energy.
I decided to leave the AI ECM behaviour as default and I didn’t mount any additional ordnance.
Example: 15nm, 1000ft
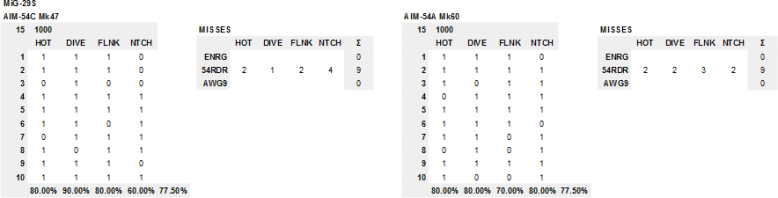
To better explain how I evaluated the results, let’s consider this scenario: 15nm, 1000ft.
In primis, some raw data (I understand these values are a bit hard to read, especially on mobile. As soon as the tests are completed I will release them in a downloadable PDF):
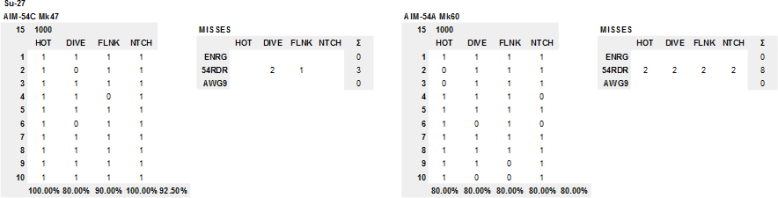

The results are fairly similar for both versions of the missile with the only exception of the AIM-54C vs the Su-27 scenario. It may be related to the bigger size of the aircraft creating a more favourable condition for the AIM-54C digital seeker.
Interestingly, the AIM-54C vs the F/A-18C in the Dive scenario has really poor hit rate. This is due to the defensive manoeuvre adopted by the Hornet and replicated each time (see the picture above). Usually the defensive manoeuvres differ slightly but this wasn’t the case. This fact reaffirms the positive effect of having different aircraft as targets.

The Summary reports the total hit percentage for both the AIM-54 that scored a hit and the one that missed the target (HIT and MISS), on top of the hit percentage depending on the aspect of the target (Hit HOT and Hit FLK). It also shows the breakdown of the misses: how many missiles didn’t hit because they run out of energy (ENRG) and how many times the AIM-54’s seeker has been defeated (54RDR).
The difference between the HOT and FLANKING hit rates is nonexistent for the AIM-54C Mk47 and slightly more accentuated for the AIM-54A Mk60 but still within the margins of the systematic error induced by the low amount of samples.
Analysis of the missed hits
Zero Phoenix missed due to lack of energy or because the AWG-9 lost the target. So, how come that 20% of the AIM-54C and 22.5% of the AIM-54A Mk60 have missed? In order to find an answer, we need to review the trajectory of the missile and the defensive manoeuvre of the target.
The following are three images of missed shots from Tacview.
With the exception of the Notching scenario, it is clear how the target notches the Phoenix while releasing Chaffs, causing the missile to follow the countermeasures. From what I have seen after almost 1500 tests, the vast majority of the defeated missiles (missiles out of energy excluded) are notched by the target by means of a perpendicular turn relative to the AIM-54 (note that the aircraft doesn’t change trajectory until the AIM-54 turns active).
The following are images of missiles that hit the target. Note how the aircraft manoeuvred differently before being hit:
This point can’t be stressed enough: the defending aircraft must aim to defeat the incoming missile not the radar of the launching aircraft when the threat is an active missile already pitbull, such as the AIM-54, the AIM-120, or the R-33. This means that the angle of the manoeuvre shouldn’t be considered between the two aircraft but between the incoming missile and your own aircraft.
The question of how to defeat a Phoenix and, by contrast, how to improve it’s PK, will be the topic of a later article.
This concludes this introductory article about the Kill Probability of the AIM-54 Phoenix. The following articles will be less focused on a single scenario, rather embracing a wider yet coherent number of tests. For instance, the PK of the AIM-54 at Low Altitude will take into consideration the results obtained at 15nm, 20nm, 25nm at 1,000ft. This different approach better suits the dynamic (virtual) reality of an aerial engagement.
Moreover, topics barely mentioned in this article, such as defending from a Phoenix launch or the missile trajectory as a function of distance and altitude, will be developed later into more interesting conclusions.
As usual, feel free to provide feedback and suggestions!
