Intercept Geometry: Table of Contents
- Part I: Introduction
- Part II: Definitions
- Part III: Target Aspect & Lateral Separation
- Part IV: Modern Gameplans (P-825/17)
- Part V: P-825/17: DT, CT, Timeline
- Part VI: Modern Intercept Demo Videos (P-825/17)
- Part VII: 2000s Intercepts (P-825/02)
- Part VIII: Intercept Progression & Lead Collision (P-825/02)
- Part IX: “Unknown Procedures” & Fleet Conversions p1 (P-825/02)
- Part X: Fleet Conversions p2 & Advanced Intercepts (P-825/02)
- Part XI: A brief look at the past (50s/60s)
- Part XII: In-Depth Timeline (from “Picture” to “Crank”)
- Part XIII: In-Depth Timeline (continuation: FOX 3/1/2)
- Part XIV: Crews’ take on Timelines for DCS
To conclude the discussion about the Modern Intercept Geometry based on the CNATRA P-825, rev. 2017, I decided to record three short demo videos.
The intent is simply showing how angles and parameters are calculated, and how gameplans can be applied and adjusted depending on the situation. Eventually, rules of thumb and shortcut can be developed to calculate some angles, but I think it is worth going into the details of the geometry at this stage.
- I modified the gameplans to fit the aircraft and the situation, often starting the gameplan at 40nm rather than 30nm (more manageable when flying as both Pilot and RIO);
- The goal is the geometry, due to time and room constraints, when flying as Pilot I used my Virpil T-50 hanging on my left (and I’m right-handed). Counterturns especially are quite imprecise because of that;
- I put together Demo I rather quickly, I spent more time making Demo II and Demo III.
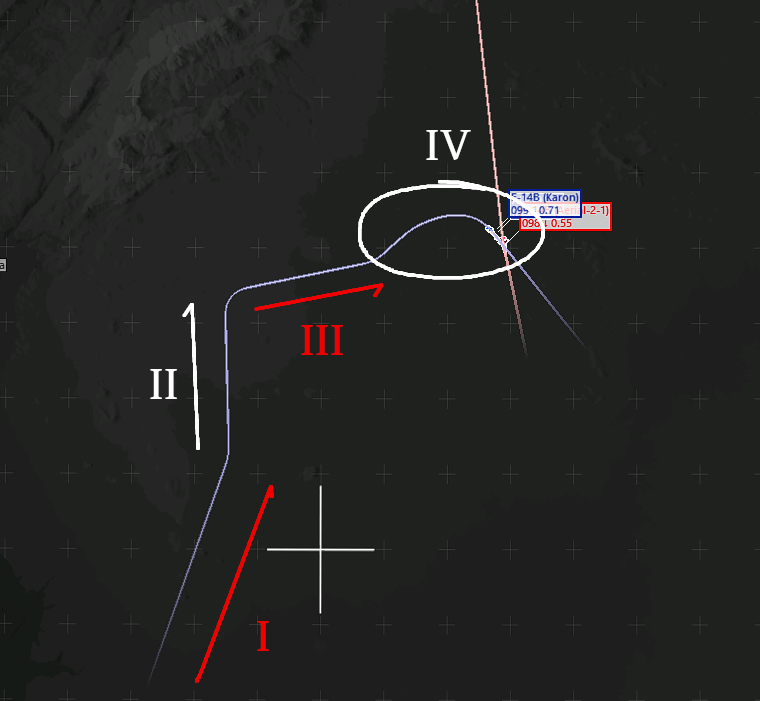
Demo I
The first demo I put together was briefly discussed in the previous part of this series.
Analysis

- Phase I: “Point and Assess”
I started with the hostile directly dead ahead to simulate the Point and Assess phase. This helps to determine the geometry and the gameplan. - Phase II: Turn to BR
Since the TA was determined to be ~25, the suggested gameplan is to turn to BR (Bandit Reciprocal) and let the TA increase. - Phase III: Turn to Collision
When the TA is close to 40°, it can be captured by turning to Collision. The manoeuvre should start when the TA is close to 36°, otherwise the TA would be greater than 40 when the turn is completed. - Phase IV: Counterturn
At 10nm, I started the counterturn to place the F-14 in the RQ (Rear Quarter) of the target. The flown F-14 was faster than the target.
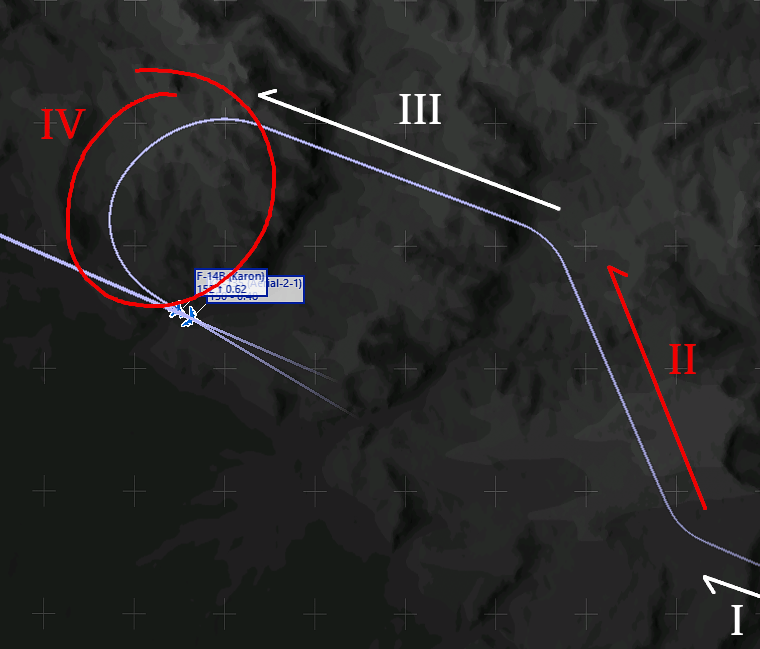
Demo II
This scenario sees the F-14 flying towards a friendly Tanker for an early morning AAR. Due to the reduced visibility and to simulate safety measures, I decided that the objective is to place the F-14 a couple of miles at 7 o’clock of the Tanker, behind the observation area.
The initial Target Aspect in this case is zero, therefore separation must be created to enable the fighter to be in a suitable position for the stern conversion turn.
Analysis

- Phase I: “Point and Assess”
The target is dead ahead. The True Head-On situation is confirmed by FH = BR and ATA = 0. - Phase II: Make room!
The doctrine suggests a turn to 50ATA at 30nm, I preferred a 40 ATA at 40nm, since it is more manageable whilst flying both seats. The goal is always the same, to increase the TA and the LS enough to enable the stern conversion turn. - Phase III: Turn to BR
The LS is very close to the desired 40,000ft, so I turned to the Bandit Reciprocal heading to capture it. - Phase IV: Counterturn
I set the fictional objective to place the F-14 at the Tanker’s 7 o’clock. A standard CT would result in the fighter too close to the Tanker. There are a number of ways to achieve the objective, such as by power management, using the vertical or, like in this case, delaying the turn to Pure Pursuit and start by using Lag Pursuit.
Demo III
The last and most complex scenario, I decided to include an AI AWACS to receive Picture and BRAA information during the flight. Eventually I decided to stick to the Picture, as asking every time is quite unrealistic and distracting.
The scenario starts with the F-14, tasking CAP, receiving the Picture from the controller and Committing. The goal is to VID a bogey.
Analysis

- Phase I: CAP
The F-14 is following is flying its CAP track and Commits to a Group in the Picture.
Correlation and additional comms are skipped since they are not supported (the AI AWACS is probably one of the worst features of the game). - Phase II: “Point and Assess”
The bogey is placed on the nose, geometry is evaluated. TA results ~45°. This phase should have been shorter and the delay ended up increasing the TA. This is an unforeseen yet valuable lesson. - Phase III: Decreasing TA and LS
Gameplan is computed and the bogey is placed at 50 ATA with speed advantage. - Phase IV: Turning to Collision
As the bogey was approaching the radar’s gimbal limits, the F-14 hit the goal of 40 TA. In order to capture it, I turned to CB. - Phase V: Counterturn
Delays in the operations (mostly due to playing as both crewman) caused the CT to start quite late. Nevertheless, the goal was visually identifying the bogey and the objective was met.
Considerations
I noticed a few things whilst putting together this short videos:
- The speed difference (ΔV) plays an important role when applying doctrinal rules meant to be used in a co-speed situation. It has two major effects:
- The Counterturn requires careful energy management (but the vertical can always be used). The RIO should monitor the CT Gates during the turn.
- Collision Bearing, calculated as Cut / 2 when co-speed, must take into account ΔV. Rule of thumb: if VF14 > VTGT, then CB < CBCO-SPD.
- The GCI/AIC is the primary source of the BH. The WCS does not know the position of the targeted aircraft, and therefore it displays only the True course. If no human controller is available, the MagVar can be approximated and taken into account to provide the Magnetic BH and BR. This, of course, reduces the accuracy of the calculations.
- The RIO should compute parameters and values quickly and effectively. Delays may affect the intercept, as the parameters (TA, LS) change constantly unless flying Zero-Cut or on Collision.
- There are three “situations” that can help the RIO once recognized:
- Point and Assess: in this situation ATA = 0, therefore BB = FH and the TA is very simple to calculate as BR → FH;
- Collision Course: when on Collision, Target Aspect is captured and does not change. The RIO can aim to CB and then hold until the LS reaches the desired value;
- Zero-Cut: or FH = BR. This captures the LS. The RIO can match the goal LS, then turn to BR and hold the heading until the CT.
- The geometry can hardly be perfect, especially when conducted by older aircraft. For example, to simplify the mental processing, rounding is used. This and other causes may affect the gameplan so the RIO has to check the parameters of the geometry now and then, even when flying with no changes (in terms of angles) for prolonged periods.
Conclusions
This article concludes the quick look at the Modern Intercept Doctrine, based on the CNATRA P-825/17. Part VII will jump backwards 20 years to discuss the basic procedures used when the F-14 was still operative.
If you are flying the F/A-18C or similar, the Modern techniques here discussed certainly apply to you: the attack display provides all the info you need (TA, BH, ATA, etc) to very easily execute the gameplans described.
The F-14 crews instead may benefit from the techniques discussed in Part VII.
At the end of the day, similarly to last year’s study about the BVR Timeline, my suggestions is to use the documentation in the manner that better fits the type of experience you are looking for. There is no “correct” way to play a video game.
