
A couple of years ago, after a “challenge” with some friends, I put together the simplest way to intercept a target I could find. Although technically the simplest is flying Pure Pursuit and call it a day, this technique is inefficient under every aspect, including the missile employment.
The simplest and, at the same time, efficient way to intercept a target I could think of back then was the Collision Course. The Tactical Information Display in Aircraft Stabilized mode offers an almost instantaneous means of understanding whether the fighter is on a collision course with the target or not. In such mode, new players just have to manoeuvre until the contact’s vector matches the F-14 symbol.
However, although the collision works, sometime the fighter is tasked to perform a different operation, such as VID, or the fighter is out of non FOX-2 missiles, and want to improve the odds of an IR missile. Perhaps again, it is simply rejoining a tanker. In these cases, a simple conversion towards the rear of the contact will do.
Although the avionics of the F-14 is surprisingly intuitive, the immediate drawback of this technique when compared to the Simplified Intercept is the lack of “no-brainer”, “point-here-and-go” indications. However, the TID in AS mode provides all the necessary tools to obtain the information the crew needs to approximate the manoeuvre.
A rough gameplan is the following:
- the distance of the target can be approximated via the TID or DDD, down to ~10nm SR;
- the fighter manoeuvres to adjust the approach, placing the target in a favourable position before the beginning of the conversion;
- the fighter turns to zero Cut;
- the crew estimates the lateral separation, to gauge how hard the turn will be;
- the fighter turns into the target, with a “steady up” in the target’s rear quarter.
Distance and Angles Approximation
The TID in AS mode tells the Radar Intercept Officer where the target will be in the near future, from the perspective of the F-14. Details such as the hooked contact’s range are provided by the two readout lines on the display, or can be eyeballed.
The idea is manoeuvring to place the target at 12-13 nm in an area half-left or half-right from the fighter’s perspective. The TID BR readout will show something close to 315-320 if the target is on the left of the nose, and 40-45 if the target is on the right of the nose. This is a basic operation to perform using the LAUNCH ZONE option in the TID Control Panel to make the vector longer and more visible.
By setting the radar to ±40°, the position we want to place the contact is even more easily identifiable. However, for newer or Jester-stuck players, TWS Auto is sometimes preferable (eventually you will probably use it less often, as TWS Manual offers more control). TWS Auto, as the name suggests, automatically adjusts the radar parameters, thus proposing a narrower and taller scan volume (4B ±20°). For this reason, I left the radar doing its things in this example.

In this specific case, the target is almost on collision course already, thus the required correction is less dramatic than other cases. The WCS is automatically setting the TWS Auto to 4B ±20°.

Zero Cut
The next step is achieving Zero Cut at about 10nm, at an angle similar to the one described above.
The Cut concept is described in the Intercept Geometry study. If you are new to it, or it sounds too complex, consider that the fighter’s goal is to fly towards the reciprocal of the contact. For example, if the contact is flying due South (180°), then the fighter will fly due North (360°).

The following image illustrates how the situation above would appear from a god’s eye point of view:

Glimpse of the Future
After the heavily simplified approaches to Timeline, Intercept and Conversion, I recommend diving into the study of the Intercept Geometry.
Albeit more complex, it will answer questions many questions. For example, the reason we want the contact to be at 10 nm, about 40° left or right, is to satisfy the requirement of Lateral Separation for a textbook stern conversion turn: the LS is calculated as TA * SR * 100, and it should be equal to 40,000ft if the textbook definition is followed. The parameters mentioned above are close to the required 40,000ft of LS at 10nm.
By flying Zero Cut, the Lateral Separation is “locked” through the rest of the intercept, although the angles (TA and ATA) are changing. Thus, the plan is to capture the desired Lateral Separation right before proceeding to turn towards the target’s Rear Quarter.
In order to place the contact in the desired position, start the turn to the Reciprocal Heading before hitting 10nm; at about 12-13nm usually works. Otherwise, the manoeuvre may be completed well within the 10nm mark.
Note that if TA is particularly high, the turn to zero cut may be quite hard. This is the main drawback of a technique that relies on visual approximations rather than maths. A more thorough approach, using the fundamentals of the Intercept Geometry, corrects this situation before approaching the conversion turn.

The image above shows the situation before the conversion turn. Textbook-wise, the amount of lateral separation is excessive (44,850ft rather than 40,000ft), but for this simplified approach it will do.
A quick means to gauge if the conversion has to be hotter or colder is the value of the Target Aspect (or the Antenna Train Angle, present on the DDD as well). Without going too much into the details, the key value is 40 L/R at 10nm. If it is greater, then the pilot has to turn harder towards the contact. Vice versa, if less than 40°, the pilot should slightly ease off the manoeuvre.
The Conversion Turn
The radar may be lost during the last few seconds before the conversion turn. However, if the parameters (sort of) match the intended values, the turn becomes a classic “easy-to-hard“: the turn starts quite “easy”, then, halfway through the turn, the ratio increases, and it is eventually adjusted as soon as Tally is called.
The pilot must be cautious and practice the turn; otherwise there is a concrete of pulling too hard. If the error occurs in the initial half of the manoeuvre, the result can be an overshot, or a rollout parallel to the target, rather than in its rear quarter.

In this example, I used TWS Auto until the turn, switched to the front seat, flipped the ACM cover and locked the target in VSL LOW almost at the end of the manoeuvre.
It was my very first attempt, with a bit of practice (and a real human RIO in the back seat – I disabled Jester first thing), the precision of the manoeuvre is noticeably increased.
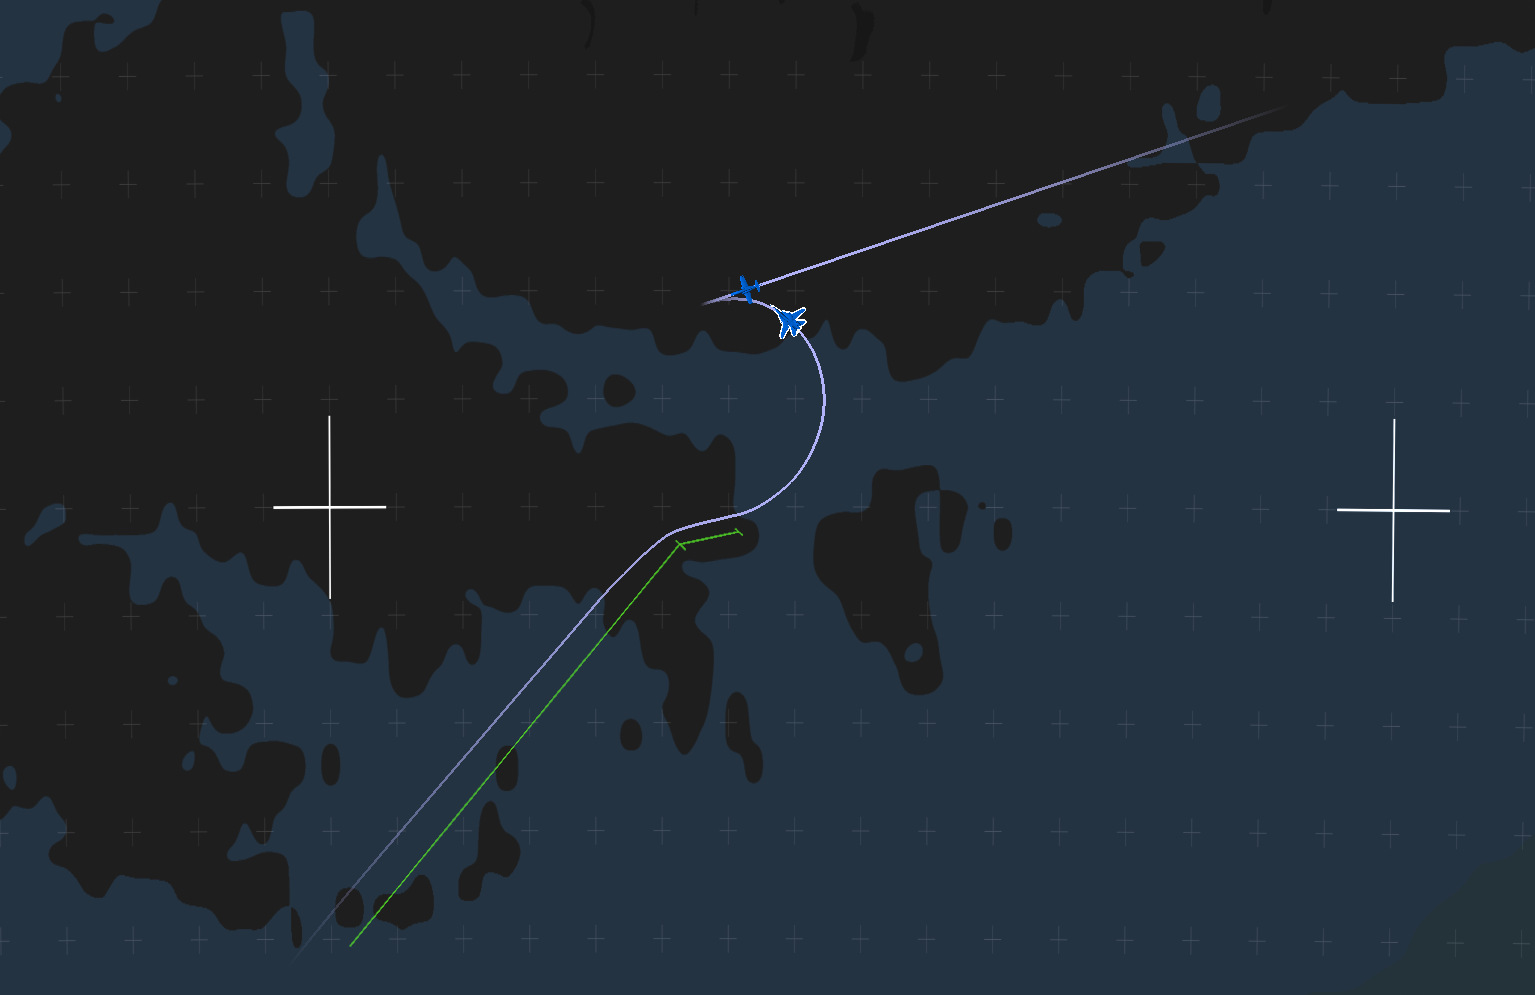
Scenario and TacView
I placed the bogey and the F-14 quite randomly in the new, shiny, South Atlantic Map.
As expected, the geometry displayed by the TID in AS mode does not match the map.

The Tacview track shows the different stages of the intercept and the conversion turn.
The green line, interpose by the dashes, mark the initial approach and the turn to zero Cut. The conversion is not a precise half-circle, but it starts easy, and it gets progressively harder, with final adjustments post Tally.

Video!
This short video covers the procedure here discussed. Seeing it makes it look even simpler!
Conclusion
The simplified conversion is more of an exercise than a practical manoeuvre, but it can come handy in specific situations. More importantly, it offers a first look at something deeper and more complex than the Simplified Intercept. In fact, it shows how information such as Headings and Angles can be used to manoeuvre the F-14 in a favourable position for an ad hoc task.